Hello Geeks. This is a new post to you about How to delete or deactivate your Instagram Account.
As we know that, Instagram has become more popular than before because of its responsive App design and this is a user-friendly application as all others. So now, it is growing gradually and containing lots of user traffic inside it. But some updates are necessary to have better performance.
These updates are -
- Independent Link creation except profile page.
- Link creation for posting and stories.
- delete or de-activate accounts using the Instagram mobile app.
So, these updates should be for the Insta Users. Today we are going to know and see about How to delete or deactivate Instagram account using a web browser with the help of a mobile phone or laptop.
It can be there different reasons. some reasons are that we will see in the below section and it can be possible - Why Insta Users does delete or de-activate their account?
- lack of time.
- someone bullied you sometimes.which is illegal.
- Sometimes Irritating when we have no follower.
- If You have become anxious and want to create a new account from this account.
- If you want to upload a new posting with a different topic.
Deactivating vs Deleting: What You Need to Know
You can both deactivate and permanently delete your Instagram account, depending on your preference.
Deactivating your account is temporary, but whilst it is deactivated, your account, along with your profile, followers, photos, likes, and comments will be hidden from other users. To restore all of this information and start using Instagram normally again, simply log back into your account.
Deleting your Instagram account cannot be undone – a deleted account cannot be restored. When you delete your Instagram account, all of your data, including photos, followers, likes, etc. will be deleted for good. In the future, if you choose to sign up to Instagram again, you won’t be able to use the same username again, nor will anyone else.
How to temporarily deactivate your Instagram account - Step by step
Note:
You can not de-activate your account using the Instagram mobile app. You must use a Web browser.
You can easily temporarily deactivate your account through Laptop or mobile. Operations are similar.
Step-1:
Open your Web Browser. such as Chrome, Mozilla Firefox, etc.
Step-2:
Type - "www.instagram.com" in URL bar.
Step-3:
Log in to your account that you want to delete or de-activate.
Step-4:
Go to your profile section.
Step-6:
Click or press on the Edit Profile button.
Step-7:
when you scroll down the screen you will get a new button of which name is - Temporarily Disable My Account. - Click the button.
Step-8:
after clicking, Instagram asks a question - Why are you disabling your account?
You can give an answer to Instagram.
Step-9:
After giving your answer, you have to give your account password for successfully de-activate your account.
Step-10:
After all, Click the Temporarily Disable Account button and click Yes.
Note:- When you press the button below, your photos, comments, and likes will be hidden until you reactivate your account by logging back in.
How to permanently delete your Instagram Account using any Web Browser
You can delete permanently your Instagram account. Follow these steps -
Step 1:
Go to your Profile Page and scroll down to the bottom of the screen.
 |
| Click the Help Button |
Step 2:
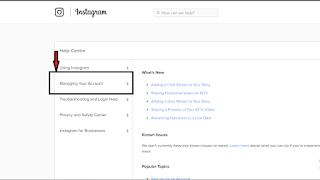 |
| Click Manage your Account |
Step 3:
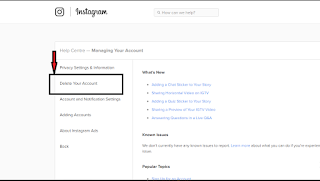 |
| Click the Delete Your Account |
Step 4:
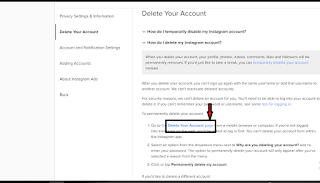 |
| Click the Delete your Account Link |
Step 5:
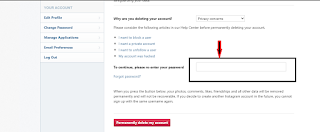 |
| Give any reason |
Step 6:
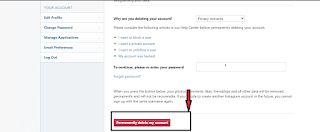 |
| Click the Delete Permanently Button |
Last Lines -
I hope you would very satisfied with my answer. my all efforts will always for you. Stay tuned with us.
If you have any queries, please contact us. Click the link - Send Message to Me
Post a Comment